 Posted on 03 July 2020 by Leanne.
Welcome to the second post in my Learn to Urban Sketch series! Last post, we learned about what urban sketching is, the supplies we use, and saw some beautiful examples of the variety of art styles that are out there.
Now that we’ve had a chance to get some supplies, get some inspiration, and try some doodles, I wanted to get into some basic drawing exercises that help you get comfortable with the medium you are using. Don’t worry if these exercises don’t turn out quite like you hoped. Learning something new takes time. You’re working on a new skill - taking what you see, using a few art supplies, and putting what you see on paper. The hardest part of art is making that mental connection, but the journey can be very fun.
Shapes

The 2D shapes that we learned back in grade school are important. They’re actually the building blocks for everything you draw! Even the most complex options are made out of the simple shapes in the image above.
Getting comfortable drawing these basic shapes will help you quickly build any object you want to sketch. It may seem easy to draw a hexagon, but it can be a lot harder when you try to physically do it.
Let’s practice - draw every one of these shapes in your own way. You want to draw a square, rectangle, circle, star, oval, triangle, and hexagon. You can also color them in if you want.
3D Shapes

You’ll deal with a lot of 3D shapes when you draw, especially with urban sketching. Buildings are rectangles, pillars are ovals… you get the idea.
Building, trees, people, furniture, and cars are a combination of 3D shapes.
Again, practice drawing these shapes! I would also like you to try your hand at shading them. You want to imagine, if a light was shining on the shape, where the shadows would be. What would be the lightest side, what would be the darkest? For now, just copy the shading in the diagram above.
Silhouettes

The last great exercise you can do to practice drawing shapes is by making silhouettes. These are flat outlines of objects you see in front of you. A lot of people find this exercise the hardest. It can be difficult to copy the curve of your coffee mug handle, for example.
Try drawing the outlines in my example above. Also, try drawing the outlines of stuff you see in front of you - like a water bottle, coffee mug, etc.
If you’d like, feel free to send me how these exercises went for you! You can get them to me through our Facebook, Instagram, and Twitter pages.
Examples of Shapes Making Up Objects
Here are some examples that I found online of how these basic shapes make up 3D objects! There’s many more out there, but here are a few:

.png)
.png)
.png)
.png)
Light And Value
With art, value is the term for how light or dark something is on the scale from white to black. White is the highest value while black is the lowest value.
.png)
Learning how to look at a scene and know which areas should be light and which should be dark is a key skill with urban sketching. Seeing these differences in values, and being comfortable enough with your tool to put what you see on the page, can take some practice.


There’s two main ways we can create these light and dark tones in a sketch. The first is cross hatching. It’s where you draw lines closer together or further apart to make shadows.
The second method is shading. This means using a color or tone to make shadows.
We’re going to practice this by making a value scale, like so:


You want to make a line of squares, like above. Using your drawing tool, color in the values, from highest to lowest. You want your lightest value on the left, the darkest on the right. So, if you’re using a pencil, you barely shade on the left, and on the very right, it’s as dark and black as it’ll go.
After you have done this, and gotten comfortable with the range of values your tool is capable of, we want to draw a circle.
Next, you’ll want to shade in the circle using the values from your value scale. Your very darkest shade, which is on the right of the scale you just drew,, will go in the shadow. The lightest values will be on top of the circle.

Contrast
One of the biggest things you need to pay attention to in art is contrast! What is contrast, exactly?
It’s the relationship between the light and dark values in a piece of art. As you work on your sketches, this will come naturally to you, so don’t worry about the terms right away.
We’re going to look at two different kinds of contrast, high and low.


What does this mean, exactly?
Low contrast means that you are using values that are close to each other on the value scale you created earlier. So, you’d only use light, or medium shades.
High contrast, on the other hand, uses lighter and darker values.
Thinking about the range of values you are using is important with sketches. Drawing a building on a sunny day would produce more high contrast values. There’s strong shadows, and strong highlights.
Drawing the same building on a cloudy day would have a lower contrast, since the light is diluted.
Perspective
.png)
We will learn more about this in my next blog post, but I wanted to mention this quickly here. It’s a drawing method that shows how things appear to get smaller the further away they are from the viewer.
So, how do I even draw from life accurately?
There’s a few methods you can use to have an easier time drawing from life accurately. I use sight measuring and angle checking. It works really well for me.
If you’ve ever walked by a street artist and saw them holding their pencil up, tilting it, and putting it back on the paper, you’ve just witnessed this method in action! It takes some practice, but once you have the movements down, it makes sketching on location a lot easier.
.png)
Rather than trying to explain it myself, I would like to point you towards this excerpt by Marc Taro Holmes. He really breaks down the process into easy-to-follow steps!
As you practice this, try not to bend your wrist, or twist your arm too much. This puts the proportions you are trying to draw out-of-whack.
If you search “sight angle measuring,” “Checking proportions with your pencil,” or “checking proportions and angles with a pencil” on YouTube you will find a lot of great video tutorials as well, if you prefer to learn that way!
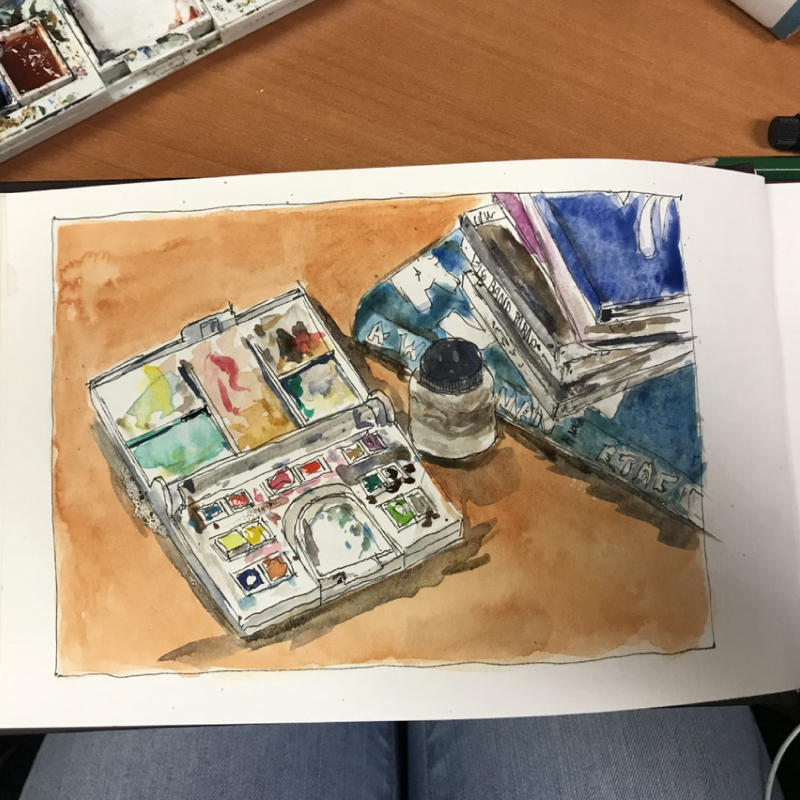
Drawing Everyday Objects: My Still Life
Here’s the process I used when I drew this still life last year.
.png)
I started by drawing the basic shapes using sight angle measuring. I broke the scene down into those basic 2D shapes we practiced drawing earlier. I also drew a few “guide lines.” The books are squares, the water jar is a cylinder, and my paint palette is tiny rectangles in a row inside a big rectangle.
.png)
After I got the big basic shapes down on the paper, I started to fill the details in with a pen.
.png)
As I always say, it’s just a sketch! Don’t worry if the lines are a little wonky. Embrace the imperfections.
.png)
When I draw, I like to focus on getting most of the details down. Depending on what I’m sketching, I’ll try and get the basic shapes down first and fill them with details. Or, if I’m rushed for time, I will start on the object I want the sketch to focus on. The background details will be filled in if I have the time.
With this still life, I worked on big objects first. Since I took the time to draw them carefully, I know they look accurate enough. Knowing that the big things line up, I drew in a lot of the small details freehand, like the individual colors in my paint palette.
.png)
After all the details were drawn in, it was time to start shading. I use watercolor for a lot of my drawings. It’s quick, the supplies are economical, and you can have a lot of fun with colors. When I’m painting with it, I usually go over the image in three passes. The first pass lightly shading each area with the main color I want to use.
.png)
Once the first pass dried I went in with a second round of color to give more depth, color, and vibrancy to what I’d already done. This image is halfway through the second pass.
.png)
Here is the finished sketch. I believe I spent about 45 minutes on it. I could have gone back and added more details, but I liked it the way it was.
.png)
Putting Everything Together
Hooray, we’ve covered the very basics of sketching this post! I hope you enjoyed following along with the little exercises, seeing more sketches, trying out sight measuring and angle checking, and seeing how I approached a drawing.
.png)
Homework
You know how I drew a still life of some of the objects on my desk? I’d like you to do the same! Grab some of your favorite things lying around your home. Arrange them in a way that makes you happy, grab some supplies, and just try drawing. It doesn’t have to be complicated. You can even draw a coffee that you got from a local shop.
.png)
.png)
.png)
.png)
.png)
If you get comfortable with that, try drawing some different things! Capture the view out your window, go for a drive and draw the landscape, or take a lawn chair and draw in your favorite outdoor space. Urban sketching is all about having fun.
***
We’d love to see what art you come up with, so please share them with us on our Facebook, Instagram, or Twitter pages. If you have any questions, feel free to email me at [email protected].
Next time, we’ll go over proportions, perspective, and how to easily add people to your sketches.
There’s also a small community of Urban Sketchers in Medicine Hat! They’re all very friendly people. If you’d like to share drawings with them, or get together in small groups to sketch, you can find them on Facebook and Instagram.