 Posted on 09 July 2020 by Leanne.
Hey everyone, I hope you had fun practicing your sketches! Last post, we learned about some basic drawing techniques, some basics, and tried to draw a few things that were in our homes. Hopefully you had a chance to practice a bit.
I wanted to get into a few more basic drawing exercises and concepts that will help you feel more at-ease with your sketches. Again, don’t worry if these don’t turn out perfect the first time you try them. I’ve been working on my art for over a decade, while sketching for almost 5 years now. Even with all this practice, things still don’t turn out quite like I hope sometimes!
Perspective

Perspective is an art technique for creating an illusion of three dimensions on a two-dimensional surface in a way that looks natural and realistic.
Remember, you don’t need to master this to make great art!
That being said, knowing how perspective works can help you create more technically sound drawings. It can also really speed up the drawing process when you’re trying to tackle a larger subject, like a building downtown.
Terms You Need To Know

Horizon Line: This is a horizontal line that is the break between the sky and the land (or ocean, in the case of the image above) beneath it.
Vanishing Point: It’s the point on the horizon line that objects come together, or appear to disappear from view.
Perspective Line: These are lines that can be drawn from the outside of the picture to the vanishing point. Use these lines to guide yourself when you draw a scene.
Don’t worry about memorizing these terms - we’ll get more into how they work together in a bit!
.png)
Tips for Adding Perspective Into Your Drawings

Making objects overlap: This creates a greater sense of depth. One object drawn in front of another object will indicate that one object is closer to the viewer than the other.
.jpg)
Size and space: Items that are meant to be further away from the viewer in a picture should be drawn (proportionally) smaller and closer together as you look into the distance.

Details: Texture, light, shading and shadows should be more visible in areas that are closer to the viewer. As you look into the distance, those details should be less defined.
Try drawing and shading each of these examples!
Let’s Practice Drawing Squares In Perspective
I love this exercise. We’ll be drawing a square using one point perspective. (It’s easier than it looks!) Follow along and draw each of the steps. Use a pencil so you can erase your lines.
.png)
Draw a horizontal line on your paper.

Now, draw a dot in the center of that horizontal line. You don’t need to use a different color. It’s just red in this example picture. This dot is your vanishing point.
.png)
Draw a square, or rectangle, off to the left side of this dot.
.png)
Draw a straight line from each corner of your square to the red dot, which is our vanishing point.
.png)
After you’ve done this, take a look at those lines you just drew. Now you are going to draw a smaller square inside of those lines, off to the “back,” closer to the vanishing point.
.png)
It’s time to erase a lot of those lines you just drew. Once you do that, you’ll wind up with a 3D square that looks like it’s perfectly receding into the background.
.png)
After you’ve done that, repeat the same exercise on the right hand side. Remember that the lines from both of your squares should point to that vanishing point in the middle of the paper.
In a sketch, all of the lines on a shape will meet up with the vanishing points on the paper. It may be in the frame, or it may be a ways off to the side, depending on the angle you are viewing the object at.
Examples of Perspective
Here’s some examples of how you can see one and two point perspective in art and photos.
.png)
.png)
.png)
Two & Three Point Perspective
.png)
Two point perspective means that there are two vanishing points in the scene. As you can see in the image above, the two vanishing points are on the streets. If you take a ruler and trace the top of the building, the windows, or the sidewalks to these two points, you can see the perspective lines all point back to these two vanishing points.
Here’s an example of three point perspective:
.png)
As we can see, if you’re looking at an urban scene, you can usually trace the perspective lines (line the roof of the building) to the vanishing point. This is a great example of how vanishing points often aren’t in the frame of a photo, or won’t be visible in your sketch.
Planning A Sketch
To make complicated sketches more approachable, it helps if you break the scene down into basic elements and then fill in the details from there.
Liz Steel has this very good example on her website of this concept in action. Here are the simple, basic forms.
.png)
And here is that sketch with the details filled in. As you can see, if you observe the major points, the little inaccuracies won’t matter.
.png)
Drawing People And Putting Them In Your Sketches
You don’t need to be a master at figure drawing to add a few people into your urban sketch. You only need to be able to draw a stick figure. Here’s a great exercise to get you comfortable with drawing a human body.

First, start off by drawing a basic stick figure. This will have a head, arms, a body, and legs. Don’t think about it too much. I used a bit of watercolor to mark where the joints are.

Now, draw another stick figure. We are adding knees and elbows this time. It breaks up the arms and the legs and allows the figure to be placed in different positions. In my example above, I put a dab of blue watercolor where the elbow and knee joints are.

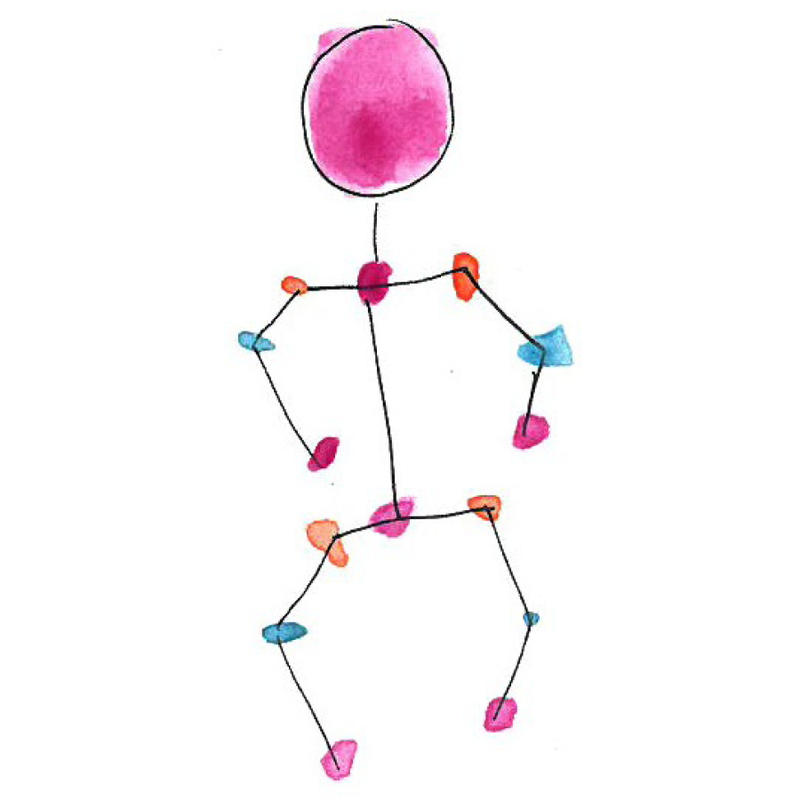
Finally, we’re going to draw a stick figure. We are adding shoulders and the pelvis this time. These are two body parts that also affect how we move. I highlighted these joints with red watercolor.
Remembering that we have a head, shoulders, arms, elbows, pelvis, and knees will help any sketch. If you find yourself feeling stuck when you’re trying to draw a person, you can quickly draw a stick figure with these main joints, in the position you’re trying to sketch. It takes a few seconds to do and can help you figure out if you need to move some body parts around to make the pose work.
Now that we’ve drawn a stick person, we are going to attempt to draw a person with accurate proportions. Remember that this is just a starting point!
We’ll add on to this by taking that stick figure and drawing it with the “classic” proportions of the human figure.

The “standard” human male figure is about eight head widths tall. This means that you use the height of your head to guide proportions. There is no perfect number when you’re drawing real people though.
Try and draw another stick figure, but using these proportions. Draw eight lines, number them, and make each major body part match with this diagram.
Adults can vary from 7-8 head heights while children are usually around 4-5.
In my diagram above, I drew in the stick figure with a thick black line, but added the shape of the human body around my stick figure.
Sight-angle measuring can help if you feel you got something a bit off about the person you are drawing. But, don’t worry if you are a bit off! A lot of beautiful sketches don’t stick to this formula, but it’s still good to know.
Why do we want to add people to our sketches?
.png)
Here are the reasons:
- Adding people gives scale (size & relationships) to your sketch.
- It adds a human element to the environment you’re drawing.
- Part of urban sketching is observing how people live, work, and play. How can you do that without people?
- To capture movement and gesture.
- The “unintentional portrait” happens when a person is so into what they are doing that they don’t move for a long time. An example of this is a person reading their phone on a bus. These situations present you with a perfect model for a more detailed sketch.
- People are one of the most complicated things to draw/paint/sketch. The only way to get better at it is to practice. What’s a more fun way to practice than including people in your art?
Ways to add people:
.png)
Stick people silhouettes are stick figures that are thickened up in areas to look like they are wearing clothes. It’s great for when scenes are zoomed out and people aren’t the main focus.
.png)
The a-frame person is a variation of the stick figure, based on the letter “A.” It’s the suggestion of a person without being anatomically correct. This is perfect for subjects that are further away.
.png)
These are the human form, made up out of basic blocks and circles. No details are needed and the pose contributes to the scene.
.png)
Again, this is the human form made up of blocks and circles, but more detailed. Things are added like clothes, hair, the suggestion of faces, and objects.
.png)
Finally, this is a more time-intensive, focused study. Anatomy, shading, details, clothing, and environment are visible. Careful observation and attention to detail is important.
Putting Everything Together
Thanks for sticking with me while we covered some more basics of sketching this week! I hope you enjoyed learning about perspective, quick ways to draw people, and a few tricks to make your sketches look more 3D and multi-dimensional.
.png)
Homework
For your homework, I would like you to keep drawing and practicing. Try using what we learned on this post in a drawing at home. For example, sketch your living room, paying attention to the angles the ceiling, walls, furniture, and ceiling have. Here’s an example - you can totally see how perspective works with this, the vanishing point is in the center of the page.
.png)
Try drawing things you normally wouldn’t. Grab a favorite figurine, sketch the view out your window, your pet, or your vehicle.
Mostly importantly, try drawing every day. A 30 second scribble of a fork is better than not creating anything at all.
We’d love to see what art you come up with, so please share them with us on our Facebook, Instagram, or Twitter pages. If you have any questions, feel free to email me at [email protected].
Next time, we’ll go over color and how to start sketching in public.
There’s also a small community of Urban Sketchers in Medicine Hat! They’re all very friendly people. If you’d like to share drawings with them, or get together in small groups to sketch, you can find them on Facebook and Instagram.